Device setup overview
AvericsUnity integrates with a wide variety of hardware devices, such as controllers, panels, readers, locks and cameras. To open the Device Setup page, navigate to Setup > Devices or click the Devices option on the Welcome Dashboard.
Device setup workspace
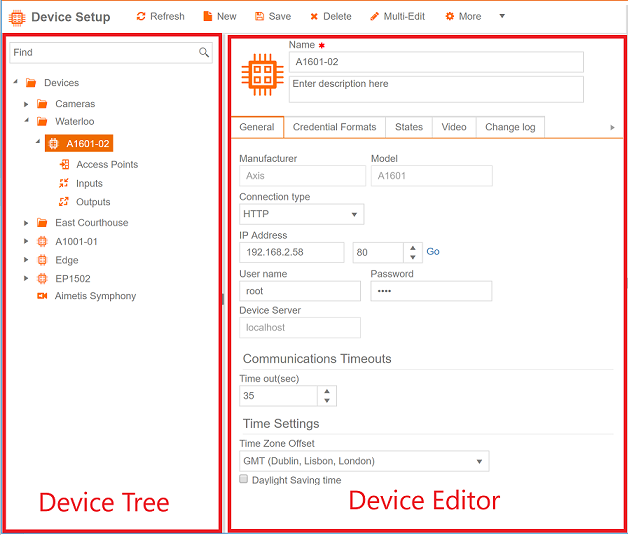
The device setup workspace consists of three areas.
- The Device Tree lists all devices and is located in the left pane.
- The Device Editor area is the main workspace area.
- The Event Viewer on the right shows a real-time log of events occurring in the system.

Managing devices in the device tree
The device tree in the left pane lists all devices that are set up in the system. The devices are listed in a hierarchy or tree. At the top of the tree is the Devices folder. All controllers appear under this folder as they are added to the system. Additional folders may also be added beneath the Devices folder to help organize the devices.
Depending on the device's capability there may be Access Points, Inputs, Outputs or Cameras presented in the form of levels/nodes under the controller. These levels/nodes automatically appear as the device is added. Some devices allowing adding panels.
Key features of the device tree
Menu bar contains buttons which control the Device Tree. The menu buttons appear for folders, devices and panels depending on the selected item. Some of the common menu buttons are

Refresh : Refresh the selected item and associated data.
New : Add a device beneath the current folder.
New Folder : Add a folder beneath the current folder.
Discover : Initiates device discovery.
Right clicking on an item in the device tree opens a menu, appropriate to that item. This right-click menu options have the same functionality as the buttons present in the menu-bar.
Drag and Drop
Devices and folders may be moved to a different folder in the hierarchy. Click and hold the mouse button on the item to be moved and move the mouse cursor to the new folder.
Find
Use the Find field (or press Ctrl + F) to locate an item in the tree. The Device tree will instantly filter based on the text typed in the Find field.
Adding devices
- Click on the Devices folder (or on any other folder) in the Device Tree and click New on the top navigation menu, or
Right-click on the Devices folder (or any other folder) in the Device Tree and click on New Device. - Click Device in the Device Type menu.
- All supported manufacturers and device models are listed in pop-up. Select the manufacturer and model of the device and click Next.
- Enter connection details such as IP Address, port number and connection type. Connection options vary by device. If the device is not an IP device select the connection type (example: DSR, O3C, HTTP) and related information such as the Device ID, user name and password etc.
- Enter the Name and Description (optional) of the device and click Save.
List of manufacturers and models shown depends upon the device drivers enabled in your software license. If you do not see a device you wish to add, contact our support.
After adding device(s), it is important to perform 'All Files' download to all the newly added devices.
Adding panels
Some devices allow interface panels to be connected directly to them to expand their capabilities and the number of readers or other devices that can be connected to them.
- Click on a device in the Device Tree and click New on the menu-bar, or
Right-click on a device in the Device Tree and click on New Panel. - Select the required Model and click Next.
- Address : Represents the address on which the panel is attached to the device.
Enter the appropriate Address and click Next. - Enter the Name and Description (optional) of the device and click Next.
- Click Save.
AvericsUnity provides device discovery which makes device adding a quick and easy process.
Discovering devices
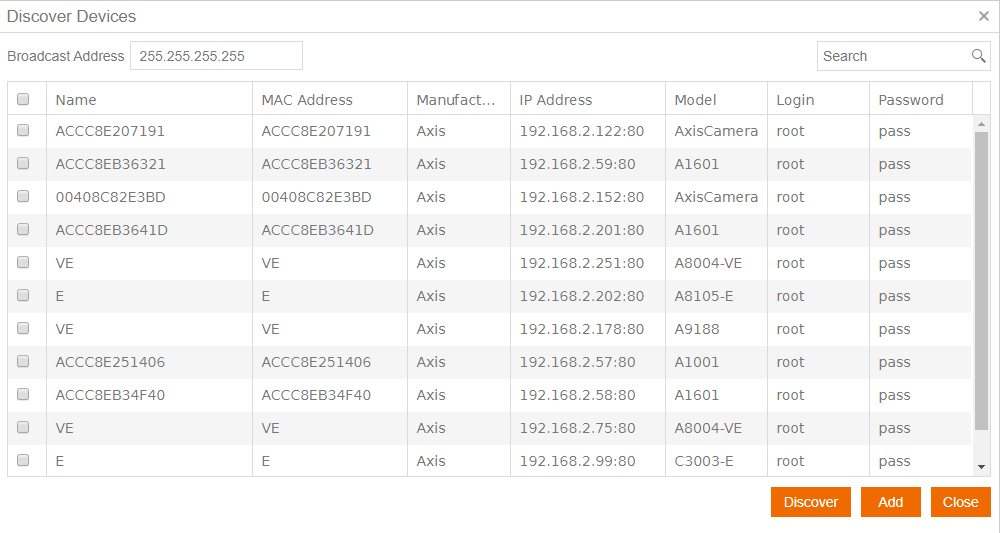
Devices that support discovery can be added by discovering them. Click on the Discover button. A pop up device discovery dialog box appears, listing all devices in the local network with details.

Broadcast Address : Use this to set your broadcast address through which you want the discovery to happen. By default it is set to 255.255.255.255.
Search : Search is performed in all the columns of the grid.
Device grid : Discovered devices show in a grid with columns like Name, MAC Address, Manufacturer, IP Address, Model, Login and Password. Users can edit the Name, Login and Password cells for every device listed in the grid. Once changes are made select the checkbox left of the device you wish to add and click Add.
Discover : Discover button allows user to manually initiate discovery.
Add : Use this button to add the controllers
Close : Closes the discovery dialog box.
Name devices in accordance with a naming scheme. Access point and I/O names are based on the device name.
General Device Properties

Device name is required and can be edited in Name field. Description is entered in the text box below Name field. User can also assign a custom image to a device by clicking on the Image that is on the left of Name field. For more information on how to assign custom images to entities, read Image Library section

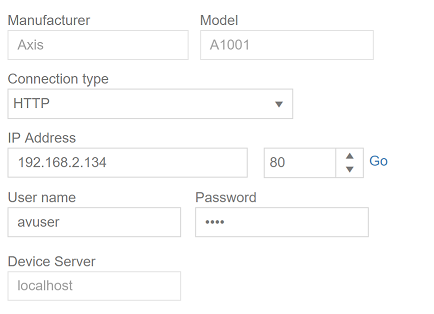
Manufacturer : Displays the name of the manufacturer of the device.
Model : Displays the model of the device.
Connection type : Determines how the Device Server connects to a device.
Device Server : Displays the name of the device server hosting this device.

Time Zone Offset : Timezone can be set to the timezone the device is in. Its helpful when controller and AvericsUnity server are in different timezone.
Daylight Saving time : Use this option to let AvericsUnity know that daylight adjustment is required for the device.